a few thoughts about
Why I Chose Contentlayer

As I set out to plan for a redesign of this portfolio I sat down and considered the blog. The reality is that I won't write posts regularly, and if the 'blog' section was just blog posts then it would end up very sparse. I was leaning towards not including a blog section at all, until I stumbled across a site that had a bookmarks section instead of a blog.
I drew inspiration from that, initially planning on only a section for bookmarks. After a few days I started mulling over the idea of merging the blog and bookmarks into one section. I would have a spot for the blogs posts I wrote, but could easily had bookmarks to provide ongoing updates and content.
With a goal in mind I turned my attention to the how of accomplishing my goals. The previous in-development version of this portfolio had used Sanity, something I had enjoyed experiencing while learning about React and headless CMS tools. It is a solid tool, but it was overkill for my needs -- I simply wasn't going to write enough to need a complicated solution.
Enter Contentlayer
Once I had decided to move on from Sanity, I felt that markdown would probably suit my needs. It would make writing a post easy -- I am comfortable with just typing away and entering my formatting via markdown syntax.
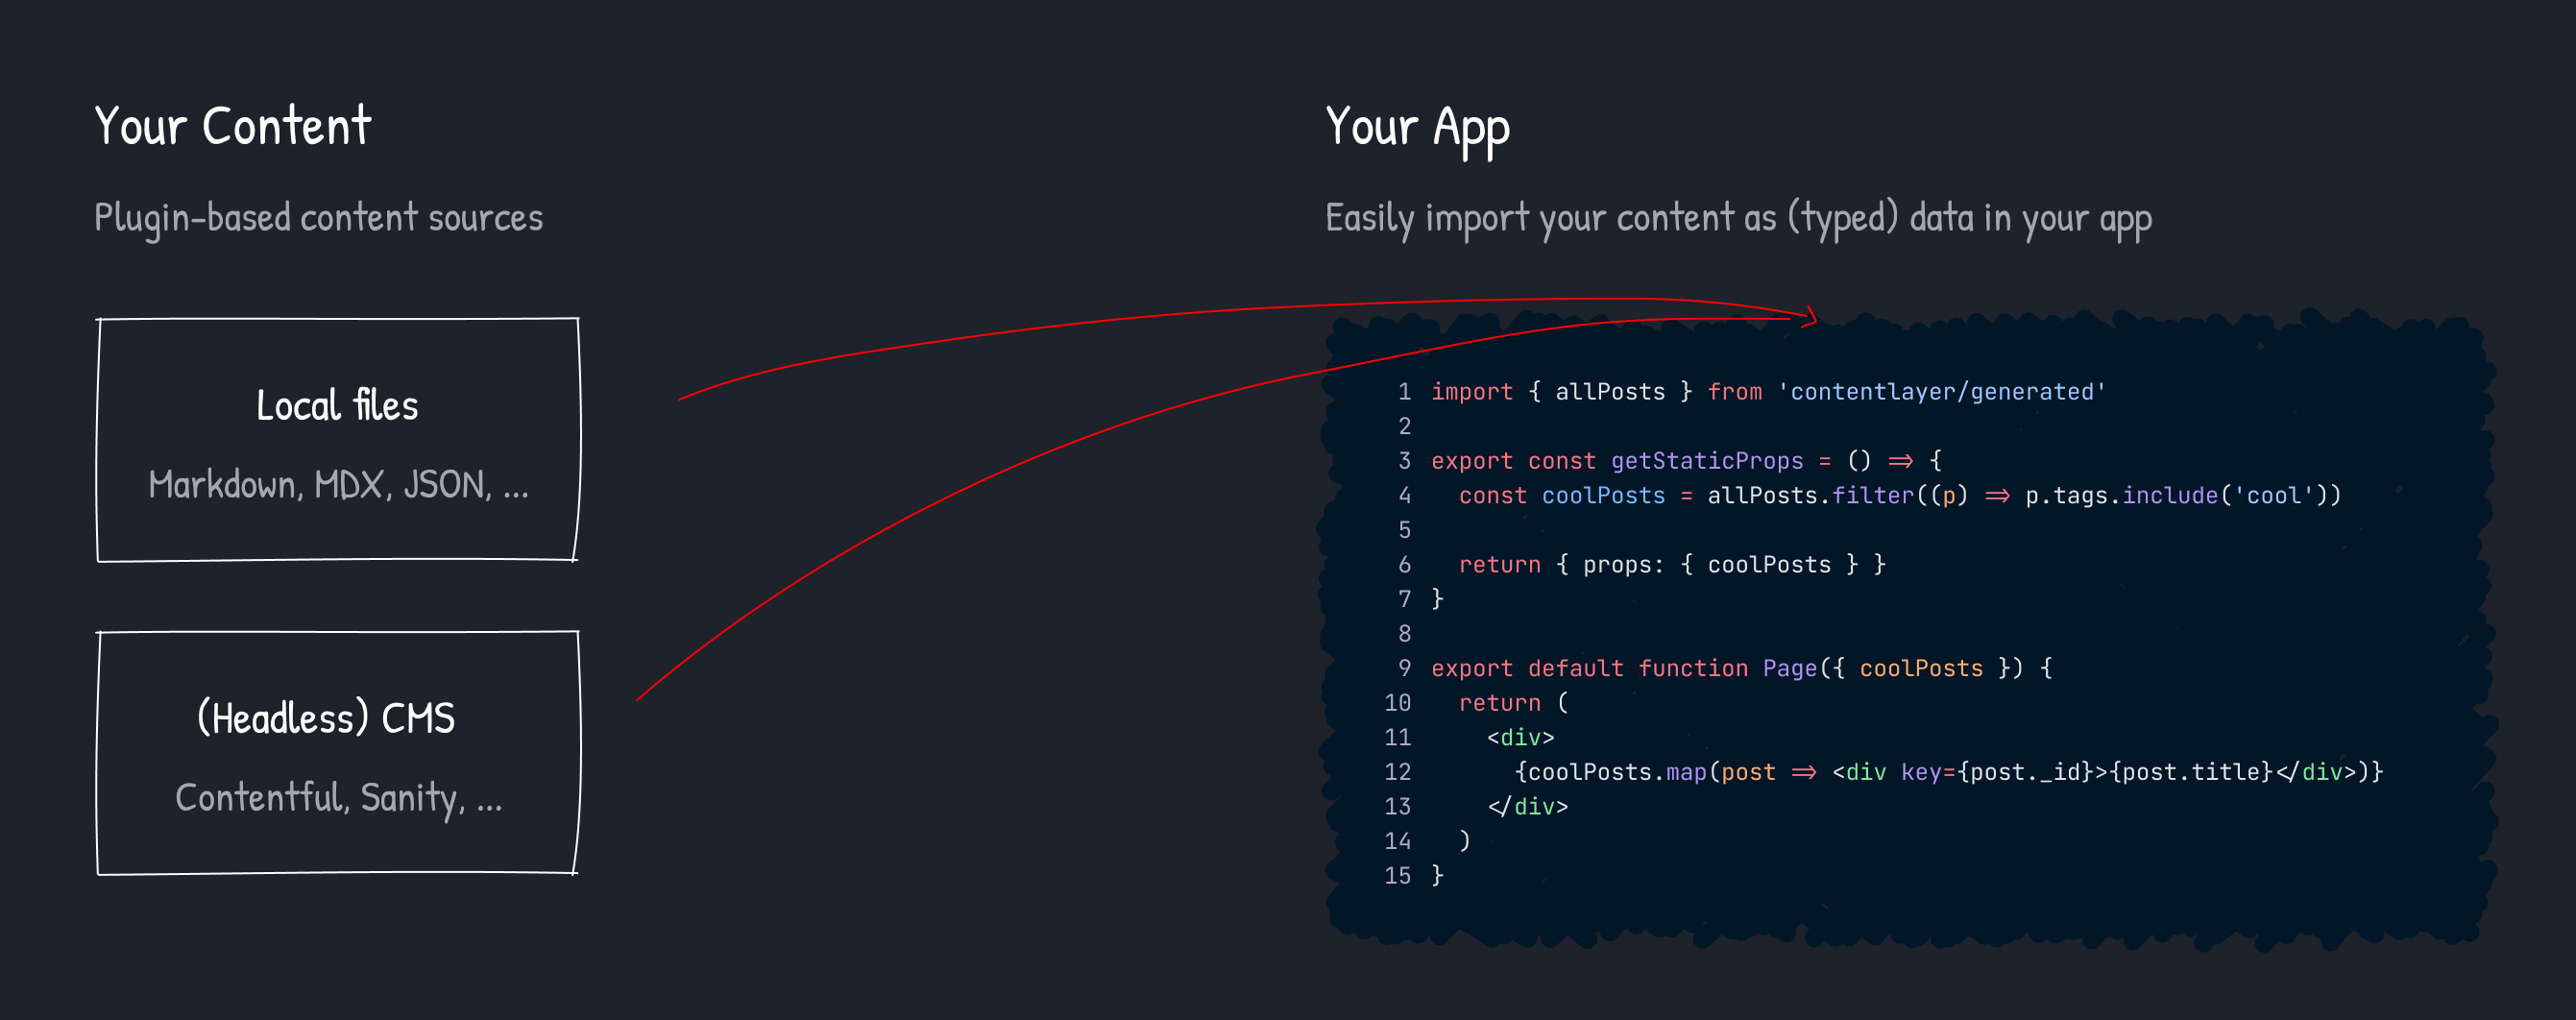
As I started looking through options to use markdown or MDX on my new design, I stumbled across Contentlayer. I'm not even 100% sure where I heard about it -- it might have been on one of Jacob Evan's Twitter spaces. To be honest, it wasn't even the first thing I tried out as a solution. One look at the docs and Lee Robinson's portfolio repository on GitHub and I was convinced.
The ease at which you can take markdown or MDX files and generate content was remarkable. And it is super easy to then import that content into your component as data and work with it. You end up with an array of objects, like you would get from a database and everything is fully typed. I could get the benefits of MDX, like frontmatter and components, very easily. I could even add remark and rehype plugins. Take a look under the featured image above -- the time to read and word count are handled by those plugins.
Once I realized how easy it would be to work with Contentlayer I immediately expanded my plans. I could easily manage my projects via the same system. And wait, I could even manage most of the page titles, content, and even SEO keywords and so on. Pretty much anything that I might want to update or edit could be managed from MDX files.
Configuring the content
With a solution chosen and my plans solidified, I set out with the redesign. I decided that I wanted Pages, Projects and Posts, with Posts having the subgroups of articles, bookmarks and projects.
I have since added a Snippets type to the posts, in addition to articles, bookmarks and projects..
/content
  /pages
    homes.mdx
    portfolio.mdx
  /portfolio
    royanger.mdx
    get-focused.mdx
  /posts
    /articles
      why-i-used-contentlayer.mdx
      colab.mdx
    /bookmarks
      github-skylines.mdx
      gradient-svgs.mdx
    /projects
      yourroomz.mdx
      royanger.mdx
/pages
Let's delve into each of the three main types, starting with Pages. Pages are the MDX files that handle the page title, keywords, and content. I started with a basic frontmatter section that would include the title for the <head> section as well as the keywords, and a title and subtitle for display on the page itself. The rest of the file is just the written content for the page. For example, the home page:
---
pageTitle: Roy Anger - Full Stack Developer
pageKeywords: react developer, fullstack developer, web developer
title: Roy Anger
subTitle: Full Stack Web Developer
---

Here is the text that would appear on the home page...
/posts
Posts have some required fields, but also some optional fields. A project post would need a github field with a GitHub link while articles and bookmarks would not. A article would need a slug while the others would not.
I settled on having title, date, postType and tags be the required frontmatter fields. Those, along with the regular markdown text, would be sufficient to sort the posts by date (newest to oldest) and determine how to display them. In the component for the /reading page, each of the three types is sent to its own component for rendering, letting me display each one uniquely on the list of reading material.
---
title: Why I Chose Contentlayer
date: 2022-04-10
postType: article
tags:
   - markdown
   - mdx
   - content
slug: why-i-chose-contentlayer
excerpt: Rather than use a headless CMS or a cloud hosted solution I opted to use Contentlayer for this my portfolio design. Contentlayer lets you easily work with content and convert from MDX, markdown and JSON fields into data. All of the imported data is fully typed by Contentlayer, making it a breeze to use TypeScript. The best part?
shortExcerpt: Contentlayer is great when working with MDX - learn why and how I use it for this portfolio
image: contentlayer.png
imageWidth: 1341
imageHeight: 531
lastEdited: 2022-05-03
---
/projects
Last up was projects. Showing off the projects I've worked on is a key element of this portfolio site. I wanted an easy, reliable way to add, edit and update portfolio items. With this in mind I took a similar approach to the posts section, and used frontmatter to setup some key fields.
I used a index field to set the order that the projects would display, letting me showcase what I consider the best as the first project and so. There is a slug field so I can tailor the slug for SEO, if desired, rather than just automatically generating it.
---
project: Get Focused
slug: get-focused
index: 01
excerpt: Get Focused is a project born out of my previous use of the Productivity Planner. I've re-imagined it as a webapp, with the same flow and approach as the written journal. The app is mostly about displaying, interacting with and loading data via forms. Built using the new React framework Remix, a framework that embraces web APIs, it allowed me to work with forms easily and effectively.
github: https://github.com/royanger/get-focused
preview: https://getfocused.royanger.app
shortExcerpt: A digital re-imagining of the Productivity Planner
techstack:
   - React
   - Remix
   - Postgres
   - Node
   - Prisma
   - TypeScript

image: get-focused-dashboard.jpg|1583|1092
gallery:
   - get-focused-dashboard.jpg|1583|1092
   - get-focused-weekly-planner.jpg|1585|1278
   - get-focused-daily-planner.jpg|1584|1278
   - get-focused-weekly-review.jpg|1586|1240
---
The final word
With the various file types in place, every piece of written content as well as images were now maintained through the .mdx files. I don't have to dig through components to update content -- just update the appropriate file. With the project hosted on Vercel, as soon as I push those updates to GitHub the CI/CD process starts and the site is regenerated. I now have a solution in place that lets me easily add and edit content, and I love the fit.
Take a look at the current version: https://github.com/royanger/royanger.com